RV Salon
Part 2
In the previous blog post found here,
I showed all the earliest stages of this renovation.
Here we have more of the finished product.
Continuing on with the saga...
After having the water heater leak water all over the place
and the subsequent repairs that had to be done,
seeing water come out of the sink and shampoo bowl sprayer
was so amazingly thrilling and encouraging!
Hearing the heater click on and feeling
warm water flowing was a milestone for us.
It felt as if we would soon be done!
Yet, still more to do.
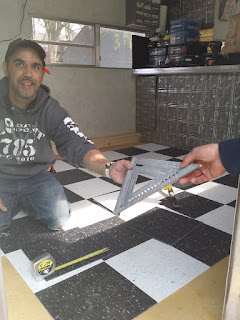
Next came the flooring...
The bathroom floor covering was a remnant that I found at Menard's which closely resembled the marbled pattern of the sink. I wanted to keep that theme going in the bathroom and was glad to have found a nice piece of flooring for it. I'm not a flooring installer, but I wanted that floor covered so badly and was so eager to get the project done, that I decided to try out an idea I had. I used newspapers and encircled the outer perimeter of the room, taping them together as I went, until I had gotten all the way back to the starting place, and then filled in the center. I then had this big pattern piece which I laid on the wrong side of the floor covering and traced with a pen. I cut it out and laid it down, trimming with a carpet knife as I went.
I used double-sided flooring tape and then added a trimming
of the metal tiling stuff that we used on the sink and station area.
Real flooring installers would cringe in horror, but oh, well... It's already done.
I'm glad for the experience, but it was really not my favorite aspect of the renovation.
My knees were shot and I was very glad it was such a small room.
Time to think about the flooring in the rest of the place!
With the photo editing feature of my phone,
I sketched in the flooring ideas I had for the main room of the salon.
I tried a few looks and finally decided on the first photo.
My favorite look.
I really liked this diamond effect below, but was not 100% sure.
I figured it might add to the cost because
it would take longer for the flooring company
to make them going at that perpendicular angle.
These oversized tiles really open up the room,
but finding tiles in the industrial grade
just as big as those squares - I was not sure if they exist.
I also thought they might be more awkward
to install smoothly on the odd floor shapes near the sinks.
After all the previous stuff we did, it was time to hire a pro.
I got a quote from Jerry's Flooring, a local flooring company,
The price was going to be almost $1,000.00 to put the commercial-grade
vintage- looking tiling down that I had envisioned.
The cost would be worth it!
We were getting kind of tired of the researching, mistake-making,
and strenuous learning process of DIY'ing it.
We were glad when we heard about their way of doing things,
which was to put down a 1/4th inch underlayment, also.
(we have never had floor tiling installed so we didn't know)
This was a great thing for support and to help level the floor.
We happily turned the project over to them.
They did a great job and it is beautiful!
The PROS!!!
Thanks, Guys!
I really appreciated your quality work and professionalism!
I waited a week for the glue to dry completely before having Mark install the chairs permanently,
which is another requirement of the Kansas State Board of Cosmetology.
We used a commercial sealer and polish to give the floor a brilliant shine.
The floor just makes the whole look!
I WAS SO, SO HAPPY!!!!
I started moving more stuff in and decorating more!
I really love the legendary Grauman's Chinese Theater
and this poster was the perfect addition to my decor!
I found artwork and little vintage decorations on Etsy.
I also love the colorful, imaginative, and interesting Traditional Chinese Theater.
Anything Asian which attracted my eye was added to the room.
I ordered the brocade fabric used in the shower curtain from China.
The colors make me happy!
One of the pleasures of having my little salon so close
is having a convenient and constant place
to practice the ideas for hairstyles I have.
I love to spend hours styling the mannequins in my collection.
My mannequin collection is growing
because I like having all textures
and shades of hair to create looks with.
I needed a place to store them
and thought if they were on the walls,
they would be a cool part of the decor.
I designed these little pegged shelves
to stage them on the wall, and Mark crafted them
for me in his man cave/tool shop.
I painted them sterling silver to match the walls.
I post photos of my hair creations here:
I have redesigned the station area and the
nearby storage multiple times since this photo was taken.
With a full range of hairstyling tools and complete makeup kit,
I need lots of places to put stuff.
I have had to downsize my studio supplies drastically
to fit everything in this little place.
I also keep a few things in storage in our house for overflow.
My most-used things are with me in "ROLLERS"
The exterior of the RV is next!
We plan to paint the outside and seal the roof.
Maybe fix the wheel well covers and get some new tires.
I can't decide on the best colors for the exterior yet.
I will update as soon that happens.
A few before and afters:
and a collage of images of the finished product.
I chose the name "Rollers" because it reminds me of a few things
having to do with my facility and my lifelong mental images of the hair business.
1. My Mom in her hair rollers while
I was growing up in the early 60's and 70's.
Often, she had rollers in her hair and a chiffon scarf on top of them,
with her cateye glasses, shirtwaist & skirt, and her red lipstick on.
2. This baby has wheels & they roll!
3. The Ubiquitous Hair Rollers,
responsible for those beautiful, epic, period hair do's.
On April 14th, 2016, Rollers was inspected and it passed with no trouble whatsoever!
NEVER GIVE UP ON YOUR DREAMS!!!
THANKS BE TO GOD
and
THANKS TO MY HUSBAND MARK
Part One
My salon website:


